Friday, May 25, 2012

Felt Flower Pillow


Is this pillow cute or what! 
If your willing to take on a bit of a project, then this DIY is definitely worth the effort. And makes for a fun-project(to do in front of the TV while watching The Bachelorette)-kind-of-craft.
Back story on the orange pillow. I have had this orange pillow since Sam and I first got married, and I have literally NEVER had anywhere to put it. Except that one time I thought it was a cute idea to have orange sheets...and that was a horrible, horrible idea. Its been sitting on random couches and chairs ever since trying to find a home, but never really ever fitting in. So its been in the linen closet for a few years, and now it finally has a purpose!

 What you'll need:
 Throw pillow of your choice
1 yard of felt
Scissors
Hot glue OR Fabric glue (Hot glue worked great, just had a few battle scars!)
Sewing pins
1 cute button

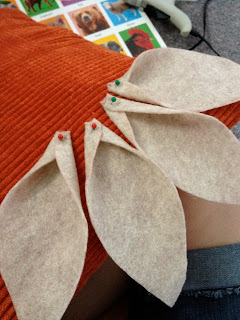
 1. Make a stencil for each petal. 4 sizes, mine started at approx. 6 inches and I made each one a little bit smaller than the first. You will use these to trace onto the felt and cut out the petals. I cut out 18 of the largest, 14 of the next size, 12 of the next and 8 of the last. Of course I didn't use them all, I just wanted to have extras in case.

2. Once all your felt petals are cut out, you can begin to glue them onto the pillow. 
If you use fabric glue you can glue the petal to the pillow, putting the pin right in to keep it in place until the glue is set. I folded the bottom of the petal slightly in and then glued it to get a dimensional look. 
*If using hot glue, you will want to place the pin slightly above or beside the actual glue spots because once the hot glue dried, it was VERY difficult to remove the pins. (See second picture below) 

3. Once you are finished with your first layer, move onto the next, removing all pins and making sure all glue is set. 

4. Once all layers are in place, the last layer I did a little differently. I laid the last layer flat, to hide all imperfections of previous layers. It made the flower look full, with no bare spots. 

5. Add your button of choice to the middle with hot glue and your done! 

Take a seat and enjoy your new pillow, or better yet, make another one for a friend!
*As always, you can find my items on my Etsy shop if your interested in just buying it and saving yourself some trouble. :)

Thursday, May 24, 2012

Look Who's New To The Yard

Just thought I would give you guys a sneak peek of the newest friends in the backyard. I don't want to show you the whole thing until we are finished...but I got some of these cuties on my birthday and had to show them off. In case you missed my first post on Gnomes, you can fill yourself in here.

Friday, May 18, 2012

DIY Snack Tray

If any of you are like me, you have a constant flow of crumbs surrounding your couches and rugs. In my case, I pretty much let Jude eat whatever, whenever and where ever he wants. Mostly because he never wants to eat, so when he does, I happily oblige. So with him, I decided to come up with something that he could sit with and end and not have to be sitting at a table (which is a struggle all of its own). I even sell these on my Etsy if your interested in all fun no work.


What you need:
Tray (I got a cheap tray from Ikea, around 8 bucks)
Paint (I always shop the oops paint at Home Depot, a small jar is .50!)
Fabric
Mod Podge
Foam brush
Scissors
Polyurethane/Clear coat
You do NOT need tape (sorry, I have it pictured) 


1.  Lay out your fabric over the tray, do a quick trace around the bottom edge so you'll know where to cut. As you can see, mine did not turn out perfect..don't sweat it!


 2. Paint around the entire upper part of the tray. In the picture, I have the tray taped off BUT you do not need to do this. I found out afterwards that since my fabric did not fit exact, it looks better if you paint around the base of the tray also. (See picture in Step 3)


 3. After the paint is COMPLETELY dry, pour Mod Podge onto the tray and completely cover over the entire base with a foam brush. Lay fabric back down and smooth out with your hands until it is completely stuck to tray.


4. After the fabric and Mod Podge is hardened and dry, add more Mod Podge to the top of the fabric. Coat and smooth over with foam brush.


 5. After its completely dry you can spray the whole thing with a clear coat spray, or you can brush on a polyurethane coat. Whatever you think with be easiest to clean. 


Here is my finished product, I would love to see yours! I'm excited to be doing another one for my outside set to take lunch back and forth from the house. I'll be doing a sneak peek of the yard soon! :)


Monday, May 14, 2012

Cheap Fun & My Soapbox

Sam and I have never been ones to spend a lot of money on toys for our kids. We don't buy them the latest kid gadgets, and we're not particularly fond of video game type toys. Jude does not go without by any means, we just don't like wasting money. Of course, we let Jude go wild in the dollar section! :) He's been very blessed by friends and family who would buy him the moon, and has a toy room that is so full, it needs a good purging. Because of this, I am always on the lookout for some good homemade, DIY kids toys and ideas.
To tell you the truth, this post was going to be solely on some cheap DIY toys and ideas, but I think my mind is starting to run in a different direction, bear with me. Because in all reality, this is why I started this blog, this is what I believe in most. I believe in having a family, and doing it on a budget. Cue soapbox.
It's important for people to know that having kids doesn't mean buying the most expensive gadgets, it means dedicating time and energy, and showing unconditional love. And that's why I believe you can have kids, and do it cheap. Too many people put emphasis on the financial aspect of having a family. Don't get me wrong, I firmly believe that having adequate finances are vital, but I also know that my husbands paycheck will never determine the way we conduct our family. I believe in a much bigger, stronger, powerful God than that. And if you don't believe me, or think that's very cliche, step out, just a little bit on faith and he'll show you just what he can do. Sometimes it not about God supplying the means for everything you want, its about him showing you to want different things.
Back to my original thoughts. 
I have recently come across some ideas that I thought were fantastic crafts you could do FOR and WITH your kids! Check out this website, modernparentsmessykids.com. They had some really great ideas of toys you could build. Jude and I tried the ocean in a bottle. 


And if your on Pinterest, you can search DIY Kids Toys and get a whole bunch of ideas! Or you can search my Kids Craft board on Pinterest. Here are some that I found: