Tuesday, April 24, 2012

I just wanna brag on some awesome people.

 Being a pastors wife, there are so many opportunities to be blessed by people who want to do something nice for you, give you something, cook for you, etc. Often though, there are less times when we actually witness people being as giving and selfless to the ones around us.
Sunday was not that day. 

I was so overwhelmed with love and appreciation on Sunday as I stare at the mountain of gifts (and food) piled on our social hall stage. 

These gifts weren't for me, they weren't for anyone in our church, they weren't even for anyone in our community. There were for a couple in need, who just had a baby. Our church was there to fill that need. No one knew them, no one had ever met them, they aren't even from this area. But we found out they needed help, and that's all that mattered. 

The people in our church never seize to amaze me. As I stare at the stage I see a car seat/stroller combo brand new in box, I see a baby swing, I see a beautiful sleigh crib and changing table, I see baskets FULL of washes and toys, multiple pack n' plays, a high chair, clothes and endless bags full of gifts. Tables FULL of food, volunteers making sure we have everything we need. All of these things for a couple in need, whom we do not know. Isn't that what its all about? Being the hands and feet of Jesus with no gain in return. We do a lot of things around here that get recognition, egg hunts, dinners, date nights, kids events, etc. But the things that impact people the most are the things done out of pure love, and pure motives, things that have minimal rewards.

On Sunday, I didn't know which made me happier...a beautiful couple getting so blessed, or being part of a church that gives so selflessly. 

We love you Central Church


Friday, April 20, 2012

Canister Updo's

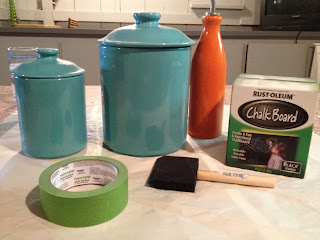
 Tired of your kitchen counters? I am. I swear, I have the most random containers on my counters in the world. I decided to buy some long overdue chalkboard paint to spruce them up a bit. 

This DIY is definitely easy, but it comes with a few quirks. No matter how easy you may think taping a straight line around a jar is, it's not. I re-taped these guys about 10 times. But other than that, this DIY is easy and has a great payoff.

The tools: 
Container of your choice
Tape (seriously Frog tape is AMAZING)
 chalkboard paint
foam brush


1. Tape off your containers (this is the part that sounds easier than it is, but after a few attempts, you'll get it almost perfect) I didn't measure anything, just eyeballed it.


2. Paint the lower portion (or upper, or the lid, possibilities are endless!) give it one nice coat. 
You can apply a second coat if needed in 4 hours. Go take a nap or something :)


3. I let mine dry overnight to make sure it was set, then pulled off the tape. There were a few minor spots where the paint bled through the tape, but my nail easily scrapped it off. The can says not to write on it for 4 days, but I wrote on them the next day..shh. You can easily wipe anything you write off with a wet rag..I don't suggest an eraser. 

Here's mine:


 In case you are wondering, the $ means coins, and that thing is FULL. 
(Sam uses it for his secret Hot n' Ready runs!)

Also, I learned from my sister-in-law that there is a chalk board marker you can use instead of real chalk I haven't tried it yet, but it sounds fun! 

Wednesday, April 18, 2012

Oh, look how they grow!

Technically they did grow, somewhere.
I was tired of my little seeds not growing in my awesome DIY planters. Also, I'm pretty sure Sam has been secretly sabotaging them from the get-go. I caught him drowning them one day in water, and they haven't been the same since. Okay, I guess that means he was trying to help...but I still say it was his fault.
I was driving by Wal-Mart the other day and saw these cuties for 1.78 (for all 6)! They are perfect for me because they are cheap, easy, and only need partial light. So I gave them a nice little home..and now I feel much better about my green thumb. (I guess until these die too, or better yet, are murdered by you-know-who.) I'm also having great success selling these planters, so if your interested in having your own, go check out my Etsy here!


Friday, April 13, 2012

So what if I want Gnomes?

I've recently had the strongest desire for yard Gnomes. I don't think Sam's budging on the topic, so I've been coming up with alternatives. Yesterday I purchased my first bird bath, and I couldn't be happier. I've been checking every 2 minutes to see if any birdies are taking baths yet. No such luck. But I'm pretty sure if I hang some bird feeders around it, I will be able to lure some birds into my backyard, and eventually if they like the food enough they will stay to bathe. 
Do I sound like a bird predator?
 :)
Anyways, whats the harm in having a fully decked out backyard? Who cares if Sam says I'm an inner 80 year old woman, who cares if I live on a main road, who cares if it is a taaad tacky. (And I use the word tad, loosely) If I wanna watch birds bathe, by golly- I'm gonna. (There's my predator talk again)
I'm going to be trying some DIY bird feeders soon, so be on the look out if you want to join me in my recent bird obsession. And go out RIGHT NOW and get yourself a bird bath. Trust me, I got this one at Aldi for 9.99, and the joy has already far surpassed the cost. 


And heeelllooo...who wouldn't want these little guys? Somebody tell Sam.


Wednesday, April 11, 2012

DIY Oil-Rubbed Bronze

It's Wednesday craft day over at Time2SaveWorkshops. Check out my guest DIY post on  bronzing any ol' outdated item that you have in your home. You can find it over here!

DIY Oil-Rubbed Bronze

Face it, we all have them….ugly brass or gold light fixtures, door handles, bathroom
knobs, brass lamps, etc. Anything you have that is gold, could easily be
updated in a matter of minutes.

In my case we have these.


 And here is the remedy: 


It’s pure magic. And it retails for about $7 at Home Depot. 

If your working with your light fixtures and your not sure how the wires work, have
someone take them down for you. In my case, that would be my dear husband. All you have to do is give them a few solid sweeps of this Oil Rubbed Bronze spray
paint. If you get this exact paint, there is no need to prime, and no need for extra
coats. I spray everything with this! (We even did our ugly brass chandeliers at
church!) I even read this blog that did their exterior door handles and
door knocker! That one took a little more effort since it’s a frequently used surface.
Just make sure to allow enough drying time before re-hanging your fixtures. And
I would suggest leaving your old light bulbs in, so you don’t get paint inside the
sockets.


Here’s our finished product, although we still have those old fashioned flowers on ours, its a much prettier sight!


This is a quick, inexpensive way to spruce up your home one step at a time! Next
time, try your old gold kitchen knobs, or that brass lamp in the corner.

Sunday, April 8, 2012

Shirts.

I learned one of those lessons today, you know, the ones you don't really want to learn.
I'm not sure anyone knew, and it wasn't even a big enough deal to talk about, but now sitting alone reflecting on Easter, this is the one thing that's sticking.
Shirts.
My morning, my day, my afternoon revolved around shirts. I was so worried this morning about stupid shirts.
I bought the boys matching shirts to wear this morning for Easter. It's a big deal in our house for three reasons. 1. Our boys NEVER match (mostly due to the fact that I don't buy brand new) 2. We rarely dress up and 3. All I wanted was a good picture, we have barely taken ANY since Titus was born. I woke up thinking about how I could preserve their shirts from getting dirty until pictures. No candy and no spit up, that is all I had to avoid.
My sweet father-in-law came in the house before church wanting to help and get Jude over to the church for me. At first I denied his help, and then realizing I actually did need it, I asked him to take Jude, but PLEASE no donuts and no muffins. I'm pretty sure I repeated myself 3 times before he walked out the door. I put on Titus' shirt carefully, telling myself that putting on 2 bibs was a tad overboard. So I get us all out the door, shirts still clean. I get to church, walk in breakfast, and what do I see?
Jude with chocolate smeared face and a wet shirt.
Was I really going to have a panic attack over a shirt?
And I admit, I had a small one, and then I learned my lesson. The one I talked about earlier. You see, it turns out that it didn't matter than Jude had chocolate smears or that Titus, undeniably spit up profusely all over his shirt. The pictures were still cute, still perfect. What matters is my relationship with my father-in-law, my example to my kids. That the reactions I choose to have, the way I respond in situations, so will my kids. I know this is text book parenting 101, and something we all already know...but somethings just make more sense realizing it on your own.

Easter was amazing. We had an amazing service, and a great lunch. Jude hunted more eggs and they both got their first Easter basket. We sat as a family and just talked for hours...perfect end to a perfect day. Most of the time we say to God, I love you, I need you, Help me, Touch me, Heal me, Your awesome...but today we say Thank you..Thank you God for what you did for us, thank you for dying on the cross, and even more, thank you for not staying there.


Wednesday, April 4, 2012

DIY Two-Tier Stand

Hey everybody! It's that time of the week again, you can check out my latest DIY guest post at Time2SaveWorkshops.com right here.
It's an easy 3-step stand that you could use for just about anything!


Tuesday, April 3, 2012

DIY Stencil (and our finished record player!)

It all started one day when I overheard someone talking about a record player.
I decided I had to have one in our reading room, since we had recently decided to get rid of our mammoth flat screen to spend more time as a family. Then it turned into an all out man hunt via Sam Anderson to find a record player at a thrift store. After a decent player was purchased, then came the immediate need for something cool to put it on. I think that's when I posted this post. I was pretty obsessed with that purple color. Anyways, finally one day we found an old record player chest type thing that had been basically gutted, score! So Sam re-built the shelf to hold the player, and voila, our new form of entertainment.
And of course you know what comes next.
Re-purpose.
You guys knew I couldn't let that 1960's wood grain go in my house, didn't you?
So I set out to paint it the purple color I wanted, with plans to do some crackle paint on top of it. Needless to say, my crackle paint was AWFUL, so I was stuck with this big purple box in my reading room. Something needed to be done and I remembered a cool doily craft I saw on Pinterest. I finally found a doily that I liked and realized to spray paint through a flimsy doily was alot easier in concept.  So I sat down and decided to turn the doily into a stencil. And it worked! Beautifully!

Here's how:
1. Spray paint your doily onto a plain piece of paper, use an exacto knife to cut out the stencil. I used black spray paint so you could see what to cut and what not to. I got a little tired of cutting out all those circles, so I started to make my own design by the end of it :) 


2. Using the stencil you made, spray paint onto whatever you want! It always turns out really cool, even if it isn't perfect.

 Here is how mine turned out. Like it? I used some fun twine knobs I found at Hobby Lobby. Sam calls them hemp necklace knobs circa 2002. But whatever, I think they are cute. They match my sweet little twine mason jars. (You can find that DIY here.)


It's so nice to have a home made piece! We are loving listening to the Beatles by day and James Taylor by night. Our hunt for the perfect record player may be done, but to Sam, the hunt for awesome vinyls, will never stop. (Great.)